
Samsung Galaxy Camera Tricks
That Make Your Photos Look Way More Expensive Than Your Phone

Samsung Galaxy Camera Tricks That Make Your Photos Look Way More Expensive Than Your Phone
Simple, sneaky hacks I wish someone had told me before I ruined 3 vacations’ worth of photos
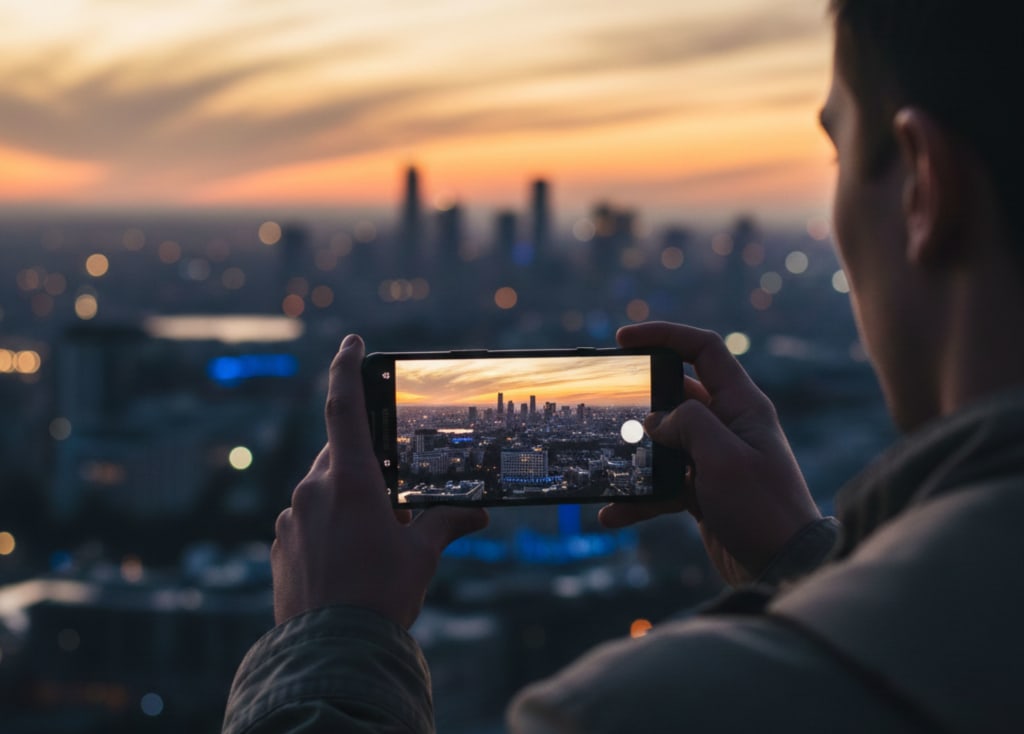
The photo that broke me was of a sunset I didn’t even see.
I was standing on a beach, ankle-deep in water, holding my Samsung Galaxy up like it was some sort of shield between me and the actual moment. The sky was ridiculous—pink smeared into orange, clouds lit from underneath like they were on fire—and my screen? A flat, washed-out mess.
I took twenty-three photos of that sunset.
Every single one looked like it had been shot on a security camera from 2004.
On the flight home, scrolling through those failed photos, I realized something quietly brutal: my phone wasn’t the problem. I was. I was walking around with a seriously capable Samsung camera in my hand and treating it like a point-and-shoot from the flip-phone era.
So I started messing with it. Obsessively.
What I found were a handful of stupidly simple camera tricks—hidden in plain sight—that instantly changed how my photos looked. Not “kind of better.” More like “wait, you took that on your phone?” better.
These are those tricks. No studio lights, no expensive gear, no editing degree. Just you, your Samsung, and a different way of using what’s already there.
The Focus Trick That Makes Your Photos Look Instantly Professional
The first time someone asked me, “Did you take this on a DSLR?” it was because of one small thing I changed: how I focused.
Up until then, I did what most people do. Open Camera. Point. Tap the white circle. Hope for the best.
That’s how you get photos where everything is technically in focus, but nothing really stands out. Your subject blends into the background, and the whole image feels flat.
Then I learned this:
Press and hold to lock focus and exposure.
Next time you’re taking a photo on your Samsung:
Open the Camera app.
Aim at your subject.
Press and hold on their face (or whatever you care about most) until you see “AF/AE Lock” or a little lock icon.
That tiny long-press does two things at once:
AF (Auto Focus) Lock: It locks focus on that specific point.
AE (Auto Exposure) Lock: It locks how bright/dark the scene is based on that point.
Instead of your phone constantly guessing what matters, you’re telling it: this is the important thing. Make this sharp. Expose for this.
The difference is wild:
Portraits suddenly have that soft background you usually associate with “real cameras.”
Street photos feel intentional instead of accidental.
Food shots look less “taken in a dim restaurant” and more “plucked from a magazine.”
Tiny extra trick: after you tap or lock focus, slide your finger up or down near the focus box to adjust brightness. Up to brighten, down to darken. That’s your instant “mood slider.”
The moment I started doing this, my photos stopped looking like screenshots of life and started looking like someone actually meant to take them.
The Mode Everyone Ignores That Fixes 70% of Bad Photos
The most boring-looking button in the Samsung camera app is “Pro.”
It’s also the one that quietly turned my low-light disasters into actual photos.
I used to avoid Pro mode because it felt like walking into the cockpit of a plane. ISO. Shutter speed. White balance. Half of it sounded like it belonged in science class, not on my phone.
Then one night at a dim restaurant, everything I shot in Auto mode looked like it had been wrapped in a yellow filter and dipped in blur. Out of frustration, I opened Pro by accident and decided to just…play.
Here’s the bare minimum you need to know to make Pro mode useful, not intimidating:
ISO: How sensitive your camera is to light.
Indoors at night? Try ISO 400–800.
Outside in daylight? ISO 50–100.
Higher ISO = brighter but grainier. Lower ISO = cleaner but darker.
Shutter speed (S): How long the camera lets in light.
People or movement? Stick around 1/125s or faster.
Still objects at night? You can risk 1/15s or 1/8s—just hold steady.
White balance (WB): Controls color temperature.
If your photo looks too yellow, slide WB toward the cooler (blue) side.
If it looks too cold or blue, slide toward warm.
The hack: don’t try to master everything. Just touch two things—ISO and WB.
Quick recipe for decent low-light shots:
Open Pro mode.
Set ISO to 400 or 800.
Set WB somewhere around 4000–5000K for warm indoor lighting.
Let the phone handle the rest.
You’ll know you’re getting close when your photo stops looking like a screenshot from a security feed and starts looking like a memory.
Pro mode isn’t about being fancy. It’s about having a way to gently nudge the camera toward what your eyes are actually seeing.
The Composition Hack: Stop Centering Everything
I used to center everything in my photos because it felt “neat.”
Neat is fine. Memorable is better.
Open your Samsung camera and turn on your grid lines (they’re in Settings → Grid lines). You’ll get a 3x3 grid: two vertical lines, two horizontal.
That’s the “rule of thirds” people love to throw around. Here’s how to use it without overthinking:
Put people’s eyes on or near the top horizontal line.
Place horizons along one of the horizontal lines (never slicing right through the center).
Put your subject where the lines intersect, not dead-center.
I tested this on a random walk one afternoon. Same street, same phone, same light. The only difference was where I put things in the frame.
Centered building? Boring postcard.
Building shifted to the right third, with sky filling the rest? Suddenly it looked intentional.
One more little trick that changes everything: tilt your phone slightly.
Not a crazy Dutch angle, just enough to break that “I stood here and lifted my arm” feeling.
For coffee shots, shoot slightly from above, not directly overhead.
For portraits, shoot from slightly below eye level to make people look more grounded and present.
For city scenes, tilt just enough to let lines lead into the frame instead of collapsing straight across.
Composition is less about rules and more about asking, “What am I really trying to show here?” The grid just gives your answer somewhere to sit.
Live Focus, Portrait Mode, and the Illusion of Expensive Glass
The first time I used Live Focus on my Samsung, I went way too far with the blur.
It looked like my friend had been copy-pasted onto a fake background. We laughed, deleted it, and I wrote off the feature as a gimmick.
I was wrong.
Used gently, Live Focus (or Portrait mode on newer Samsung models) is one of the fastest ways to make phone photos look like they were shot on a camera with an actual portrait lens.
Here’s what changed everything: treat the blur slider like hot sauce—use less than you think.
How to get clean, believable background blur:
Open Portrait or Live Focus.
Have your subject stand a few steps away from the background (not pressed against a wall).
Tap on their face to focus.
Use the blur slider, but stop around the middle—not all the way.
Check their hair edges, especially around messy hair or hats. If it looks like sloppy cut-out work, dial the blur back.
The trick is distance. If your subject is too close to the background, the software has to work harder and often fails. Give it space. Let the algorithm breathe.
Bonus: some Samsung models let you change the blur after the shot in the Gallery. If you overdid it, you can soften it later.
The goal isn’t “maximum blur.” It’s depth. A sense that your subject exists in a real space, with layers, not just pixels on a screen.
Night Mode: The Feature That Saves Your Dark, Grainy Photos (If You’re Patient)
Night mode sounds magical until you try it on a moving person and end up with what looks like a haunted watercolor.
The thing no one tells you: Night mode needs you to hold still longer than feels normal.
Samsung’s Night mode works by taking multiple photos in quick succession and blending them. That’s why it brightens scenes without turning them into mush—if you don’t move.
Here’s how to get photos that look like they were taken with a tripod when they definitely weren’t:
Turn on Night mode.
Brace yourself. Literally. Lean against a wall, rest your elbows on a table, or press the phone gently against a solid surface.
Press the shutter and keep holding still until the little progress circle finishes. It’s always longer than your instincts think.
Avoid moving subjects when you can. Street lights, buildings, night skies—all perfect. People? Ask them to freeze for a moment or catch them when they’re naturally still.
Also: don’t be afraid of slightly darker night photos.
You don’t have to brighten everything until it looks like daytime. Darkness is part of the mood. Use the exposure slider to pull the brightness down a bit if your Night mode shots feel too artificial.
The first time I did this with a rainy street, the reflections came alive: neon signs in puddles, tail lights stretching across wet asphalt. It felt less like a phone photo and more like a still from a movie.
The Zoom Trap That’s Secretly Ruining Your Photos
I used to pinch-to-zoom all the time.
Bird on a rooftop? Zoom. Friend across the street? Zoom. Cool detail far away? Zoom until the pixels begged for mercy.
Here’s the harsh truth: most of the time, your zoomed-in photos aren’t actually zoomed. They’re cropped.
Unless you’re switching between actual camera lenses (like tapping 0.5x, 1x, 3x, etc.), you’re often just asking the software to blow up your image. That’s how you get fuzzy, crunchy-looking photos that fall apart as soon as you enlarge them.
Here’s the fix that made my shots noticeably sharper:
Use the preset lens buttons (0.5x, 1x, 3x/5x) instead of pinching.
If you have to pinch-zoom beyond your optical lens, take the shot at 1x and crop later in the Gallery.
Yes, it feels less satisfying in the moment, because you don’t see the close-up on your screen. But your final image will be sharper and more detailed.
It’s the difference between digital guessing and optical reality.
I tested this at a concert once. Two photos:
One: zoomed in with pinch to see the performer’s face.
Two: taken at 1x, then cropped later.
The cropped 1x shot looked cleaner—like you could still see the texture of their jacket—while the zoomed shot turned into mushy noise.
Resist the pinch. Your future self scrolling through your photos will thank you.
Quick Camera Settings That Quietly Make Everything Better
There’s a quiet kind of satisfaction in opening your camera and knowing it’s already set up to help you instead of fight you.
A few tiny Samsung settings made a huge difference for me:
Turn on grid lines.
Settings → Camera → Grid lines. Helps straighten horizons, improve composition, and stop you from accidentally decapitating people at the neck.
Use “Shot suggestions” (if available).
Samsung has a little AI guide that subtly suggests better framing. Is it perfect? No. But it nudged me out of some truly chaotic compositions when I was tired or distracted.
Change your aspect ratio with intention.
3:4 is native and gives you the most resolution.
9:16 is good for Instagram Stories, TikTok, and vertical content.
1:1 is for the square-photo nostalgic souls.
Try shooting important photos in 3:4, then cropping for social later. You’ll have more to work with.
Clean your lens. Seriously.
Half of “my camera sucks” complaints are actually “my lens has three fingerprints and a smear of mystery lotion.” Quick shirt wipe. Every time.
None of these are glamorous. They don’t sound like “hacks.” But they stack. One small advantage on top of another until your “just a phone” photos quietly start to look like something else.
The Real Upgrade Isn’t in the Camera App
The more I learned these tricks, the more I realized something uncomfortable about that ruined sunset photo: it wasn’t the camera’s fault and it wasn’t just mine, either.
It was the way I was using my phone as a barrier instead of a tool.
When I started actually paying attention—locking focus, choosing where to expose, thinking about composition—I also started looking at the world harder. Shadows on buildings. The way light hits someone’s face at 4 p.m. Reflections in puddles. Neon flickering on wet pavement.
The Samsung camera didn’t change. I did.
And that’s the part no spec sheet or feature list can sell you.
So here’s the quiet takeaway: your Galaxy is already better than you think it is. You don’t need a new phone to take better photos. You need new habits.
Long-press to lock what matters.
Use Pro mode when Auto is lying to you.
Let the grid lines guide you, not control you.
Trust Night mode, but be patient.
Avoid the zoom trap.
Clean the lens. Always.
The next time you’re standing in front of a sunset, or a city skyline, or a simple moment that just feels like it matters, try one of these tricks.
Not to impress the internet. Not to pretend you shot it on some $2,000 camera.
But so that when you look back later, the photo feels a little closer to what it actually felt like to be there.
That’s the real upgrade.
About the Creator
abualyaanart
I write thoughtful, experience-driven stories about technology, digital life, and how modern tools quietly shape the way we think, work, and live.
I believe good technology should support life
Abualyaanart
Keep reading
More stories from abualyaanart and writers in The Swamp and other communities.
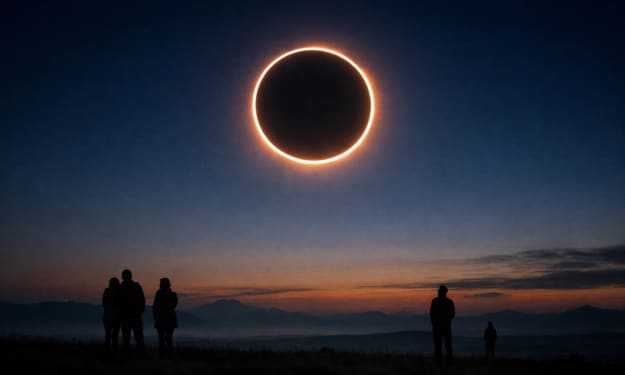
Annular Solar Eclipse
Watching the Sun lose its regular shape is both beautiful and unsettling in a quiet manner. Not go away altogether or plunge the earth into darkness, but develop into a bright circle in the sky. During an annular solar eclipse, that's exactly what happens.
By abualyaanart12 days ago in The Swamp
A Gathering of Evil Bosses
“I’m the queen of chin jutting while I smooth my hair, attacking, insulting, and deflecting to protect my appointer.” “Oh, please, Blondi, my hair is curled, highlighted, and longer than yours. I feature television commercials telling immigrants that we will give them a free plane ride home, and if they voluntarily turn themselves in, they will be allowed to legally apply for re-entry. It runs everywhere, and I look good in it! You can’t compete because of your blond hair. Mine is nicer, and my lips are prettier than yours.”
By Andrea Corwin 3 days ago in The Swamp
As Sudanese City Returns to Life After Two-Year Siege, Drone Threat Lingers
After nearly two years of isolation, hunger, and constant shelling, parts of a once-thriving Sudanese city are cautiously returning to life. Markets have reopened, children are back in makeshift classrooms, and families are attempting to rebuild homes reduced to rubble. Yet despite the visible signs of recovery, fear still hangs in the air as drone attacks and sporadic fighting continue to threaten fragile stability. The city, located near the conflict-scarred capital region of Khartoum, had been under siege since fighting erupted between the Sudanese Armed Forces and the paramilitary Rapid Support Forces in April 2023. Roads were blocked, electricity cut, and medical supplies depleted as residents endured months of bombardment and starvation. Now, with front lines shifted and some checkpoints lifted, civilians are slowly returning to neighborhoods that had been abandoned. Street vendors have resumed selling vegetables and tea, while small workshops are repairing bicycles, phones, and generators. “We survived on dried bread and rainwater for months,” said Ahmed, a shopkeeper who reopened his grocery stall last week. “It feels like the city is breathing again.” Hospitals that were once overwhelmed or destroyed are beginning to function with limited capacity. Volunteer doctors and aid workers have re-established clinics using donated equipment and emergency supplies brought in through newly accessible routes. However, health services remain fragile. Many medical professionals fled during the siege, and medicine shortages persist. Despite the return of daily activity, danger has not disappeared. Drone attacks have become a defining feature of the conflict’s latest phase. Residents report hearing buzzing sounds overhead, followed by explosions targeting military positions or suspected supply routes. While the strikes are often aimed at fighters, civilians are frequently caught in the crossfire. “Drones don’t distinguish between soldiers and families,” said Fatima, a mother of four whose home was damaged by a blast last month. “We are rebuilding, but every time we hear one, we run inside and pray.” Security analysts say drones have changed the nature of the war. Once dominated by ground battles and artillery fire, the conflict now includes long-range aerial surveillance and targeted strikes. Both sides accuse each other of using drones to intimidate civilian populations and disrupt humanitarian efforts. International organizations warn that renewed attacks could reverse the fragile recovery. Aid agencies are attempting to expand food and medical assistance but face challenges due to insecurity and damaged infrastructure. Power lines and water systems remain unreliable, forcing residents to depend on generators and wells. The humanitarian toll remains staggering. Millions across Sudan have been displaced since the war began, with entire communities pushed into refugee camps or neighboring countries. Those returning to the city describe scenes of devastation: schools reduced to shells, mosques burned, and markets looted. Local leaders have formed neighborhood committees to organize clean-up efforts and mediate disputes. Young volunteers sweep debris from streets and repair shattered windows using scrap wood and plastic sheets. These grassroots efforts have become symbols of resilience in a city that many feared would never recover. Still, residents say peace feels temporary. Nighttime curfews remain in place, and many families sleep in one room for safety. The sound of distant gunfire is common after dark, reminding everyone that the conflict is far from over. Diplomatic efforts to broker a ceasefire have so far failed to bring lasting peace. Talks mediated by regional and international partners have stalled repeatedly, while clashes continue in multiple parts of the country. For now, people are focused on survival and small victories—opening a shop, planting vegetables, or sending children back to school. “We don’t know what tomorrow will bring,” said Ahmed. “But today, at least, we can live.” As the city struggles to rise from the ruins of a two-year siege, its future remains uncertain. Life is returning, but under the constant shadow of drones and renewed violence, the path to lasting peace still seems distant.
By Fiaz Ahmed 6 days ago in The Swamp
The Cairn Beside the Lake
And so it came to pass that King Ertharion, Tenth King of Lombaia, stood beside the still lake below unrelenting and unassailable cliffs with the remainder of his harried host. In what was the tenth year of his reign and his forty-fourth upon this great green earth, Menigo the Betrayer, cousin of King Ertharion, pressed home his false claim.
By Matthew J. Fromma day ago in Fiction


Comments
There are no comments for this story
Be the first to respond and start the conversation.